![]() October 2001
October 2001
Scrapbook Your Scouting Memories
By Dian Thomas
Photographs by Vince Heptig
It's America's fastest-growing hobby and a fun-filled way to preserve those years of blue and gold and khaki.
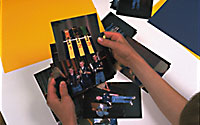
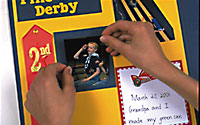
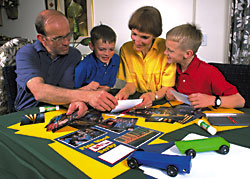 Cub Scouts Daniel and Cameron Thomas of Pack 3840, Salt Lake City, Utah, help dad, Clyde, and mom, Lori, choose photographs about making and racing pinewood derby cars for their scrapbook. |
Remember all the fun your son had at his first pinewood derby? How about the time he trekked across Philmont's backcountry with his Boy Scout buddies? Or the day he stood proudly at his Eagle Scout court of honor?
You can treasure those memories forever by creating your own Scouting scrapbook. Making one will help you organize and preserve your son's photos, awards, and other memorabilia. And it's as easy to do as cut and paste.
So get out your photos, scissors, and glue and let your creativity take flight. Years from now, you'll cherish your scrapbook of Scouting memories.
1. Photos come first.
Your scrapbook begins with photos. You may already have a large number to choose from—after all, Americans take approximately 55 million photographs a day. That's a staggering total of more than 20 billion pictures a year, according to the Photo Marketing Association.If your photo collection is thin, you can build it by remembering to take a camera with you to all Scouting events. You don't need an expensive one; many one-time-use models produce fine prints. Take photos of all special occasions: the pack's pinewood derby and blue and gold banquet, a troop's court of honor, or an Order of the Arrow service project.
Don't forget to snap shots of everyday Scout meetings or moments at home when your Scout is working on a merit badge or hobby. Ask another Scout or a leader to take group photos of the entire den, troop, or crew, as well as individual photographs of your son.
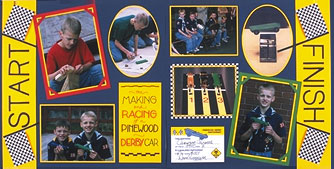 An eye-catching arrangement of photographs, headlines, and art reflects all phases of the pinewood derby—from sanding and painting the racer to weigh-in and racing on derby day. ("The Making and Racing of a Pinewood Derby Car" by Karen Glenn) |
2. Select a theme.
Tell your child's Scouting story by picking a theme for each page or each two-page spread. Some themes you could choose are:
- Events: a Cub World visit, Scouting show, court of honor
- Places: summer camp, high adventure base, national jamboree
- People: "My Scout Patrol" or "My Cubmaster"
- Awards: rank advancements and merit badges
- Activities: hiking, canoeing, swim-ming, rock climbing
3 Pick the best photos.
Do you have 15 photos from a fishing trip or a troop hike? Narrow your choices to the best pictures in the stack. Consider using only one picture of each person in an individual setting, such as one photo of the Cubmaster standing by the pinewood derby track or one of your son holding his race car. If you don't think you have enough photos, remember that a single photo can be the focus of a page. One photo will leave more room to add a written description and artwork.
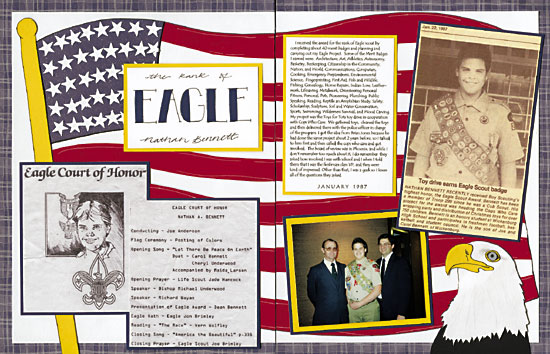 Scout advancement is a favorite scrapbook theme. Collect photographs from camp, merit badge work, and service projects that tell your son's story on the trail to Eagle. ("The Rank of Eagle" by Brenda Bennet, June 2000 issue of Creating Keepsakes magazine) |
4. Choose a focal point.
From the two to eight pictures that are the "finalists" in your stack, pick the shot that will attract the most attention. Stacy Julian, author of Core Composition, explains: "For your 'focus photo' select a photo that has one or more of the following qualities: (1) clear focus, (2) good use of light and shadow, (3) an interesting background, (4) a photo that expresses the theme you have chosen for your scrapbook page, or (5) a favorite photo."
5. Select a color scheme.
To create a connection on a two-page spread, you may want to repeat one or two colors from your focus photo on both pages. If you have a green background on the left page, you might want to include a green picture frame, green die-cut, or a green piece of patterned paper on the right. Using the same colors and shapes on both pages helps pull the spread together.
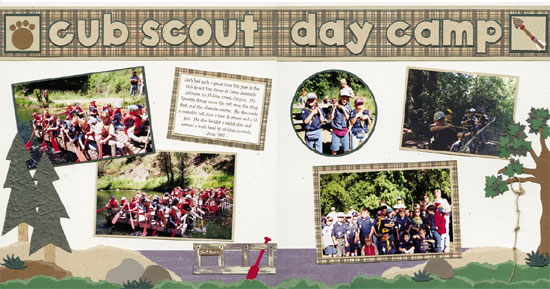 Events such as Cub Scout day camp are filled with scrapbooking possibilities. Be sure to take pictures of all the game and craft activities. Ask your son to write a paragraph about his favorite memories and include it along with artwork and patches from camp. ("Cub Scout Day Camp" by Kerri Bradford, June 2000 issue of Creating Keepsakes magazine) |
6. Place the photos on the page.
Except for covers, most scrapbook layouts are made from two pages placed side by side. Move your photos around the blank pages to consider a variety of designs. Try several placements until it feels like the pages are "balanced." A balanced page includes a fairly equal number of photos and other design elements, such as certificates or written paragraphs or art on each page.
Remember: Angles are interesting—don't be afraid to place a photo diagonally. Overlapping elements also add visual interest. Feel free to overlap the corners of two photos or place a photo diagonally across the corner of an award certificate. Placing a photo flush with the edge of your page can create a dramatic look.
Add emphasis to a photo's subject by cropping or cutting pieces from its edges to create an interesting shape. At the same time, be careful not to crop out something you'll enjoy seeing 10 years from now, such as legible bumper stickers on a car or price signs in a grocery store window.
Be sure your scrapbook contains acid-free and lignin-free materials to preserve your photos. Acid-free paper has been treated to neutralize or remove the acids present in wood pulp papers. Untreated papers can react with chemicals in photos and other mementos and cause them to turn brown or become brittle.
Lignin is the chemical in newsprint that turns old newspapers yellow. In time, it can turn to acid. To find out where to buy acid-free and lignin-free paper, call a large hobby supply or photo supply store near you. If you buy materials at a hobby or photo supply store, ask if they are acid-free and lignin-free.
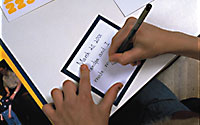
7. 'Journaling' tells your story.
"Journaling" is scrapbook lingo for adding words that tell a story about your pictures. "Look at your photos and pretend no one knows what you were doing that day," suggests Angie Pymm, a consultant with the company Creative Memories." In just a few sentences, write what happened before, during, and after the moment in the photo."
For example, write where the troop went on its camp-out, which activities the Scouts enjoyed, and which fish they caught. List the place, date, and names of people in the photo. Struggles can be part of the story, too. Tell how hard it was for the boys to bait their hooks or start a fire.
"Don't worry that your words aren't perfect," Pymm adds. "Write the way you talk and the way you feel. When you look at your album 10 years from now, reading your own words will be part of the fun of sharing your scrapbook."
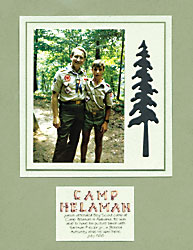 A single page can introduce a scrapbook theme. ("Camp Helaman" by Nancy Church, June 2000 issue of Creating Keepsakes magazine) |
8. Adding scrapbook extras.
After you choose your focus photo, design your layout, and add journaling, it's time to think about scrapbook extras. But before you decide to add die-cuts, stickers, strips of patterned paper, or stamped images, look at your page and ask yourself if it's finished. If it looks fine without enhancements, it is probably complete. Empty space can be an enhancement in itself.
You might consider enhancing one page out of three, remembering that your photos and journaling are the important part of your scrapbook. If you do go for extras, consider repeating elements that are already a part of your page. Choose a fish sticker to complement that fishing trip page or add a die-cut oar or tent or a binoculars sticker to a camp-out page. Accents can guide your viewer's eyes from one page to the next. Adding a patterned paper frame to a photo or creating a simple border you cut from colored construction paper may be all that you need.
9. Create a "pocket page."
Lisa Bearnson, editor of Creating Keepsakes magazine, explains that a "pocket page" is a scrapbook page with another piece of paper attached. You can create a "pocket" by gluing or taping another piece of paper to the scrap-book page on three sides.
"A pocket page allows you to keep items that you don't want to glue inside the scrapbook. It's perfect for badges, ribbons, sample knots, or other memorabilia," says Bearnson.
10. Unleash your creativity.
Lisa Bearnson says that each Scouting scrapbook can be as individual and unique as each boy who is a Scout. Your scrapbook is your creation, and it reflects your son's interests and experiences. There is no right way to create your book. Experiment with your own designs and ideas."
Look at your photos to help determine which memories are most important to you," she says. "Most of all, a scrapbook is a place to be yourself and have fun."
Dian Thomas is the author of Recipes for Roughing It Easy, a cookbook featuring more than 200 recipes for outdoor grilling and baking. She lives in Salt Lake City, Utah.
Scrapbooking Is BoomingAccording to the Hobby Industry Association (HIA), one in every five households participates in "scrapbooking," America's fastest-growing hobby. HIA reports that Americans spent more than $500 million last year on scrapbook supplies. In addition, seven national magazines cater to fans of the hobby, and annual conventions and trade shows devoted to it attract thousands. |
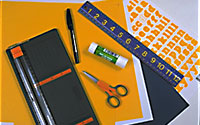
Tools and Tips for BeginnersAngie Pymm, a consultant with the company Creative Memories, says that while hobby and scrapbook specialty stores are filled with an enormous variety of items, such as die-cut shapes, patterned paper, and colorful stickers, "it's easy to start 'scrapbooking' with a few basic materials." She suggests starting with an album and plain white pages, an adhesive, one or more Pigma pens, a trimmer, some colored paper for decorations, a pair of straight-edge scissors, a pencil, a ruler, and a pocket dictionary to help with spelling Pymm advises keeping all of your equipment together in a box or plastic tub so that all of your tools are organized and ready to use. Here is a list of common scrapbook tools:
|
Software and Web SitesDon't like using scissors and paste? With software such as Hallmark Scrapbook Studio Deluxe (Windows CD-ROM, from Sierra, $40), you can create complete scrapbook pages with photos and journaling with just a click of a mouse. Choose from a variety of predesigned page layouts and themes or create your own. Import photos from a digital camera or scanner and then crop, shape, and fit them into your layout. Dress up the pages with text and lettering in a host of different fonts. Finally, use a color inkjet printer to output the finish product. 
For scrapbooking ideas, the Internet has abundant resources. Here are some sites to get you started:
|
October 2001 Table of Contents
Copyright © 2001 by the Boy Scouts of America. All rights thereunder reserved; anything appearing in Scouting magazine or on its Web site may not be reprinted either wholly or in part without written permission. Because of freedom given authors, opinions may not reflect official concurrence.
| The Boy Scouts of America | http://www.scouting.org |